How to use the Overview tab in WordPress Manager
The Overview tab in WordPress Manager is your central dashboard for monitoring and managing your WordPress installation at a glance. In particular, it displays essential information about your site including the URL, installation directory, WordPress version, database name, and current environment status. Furthermore, this screen provides quick access to important management tools like clearing cache and accessing your WordPress admin panel.
What you’ll see in the Overview tab
When you open the Overview section, you’ll find all critical information about your WordPress installation displayed in an organized layout:
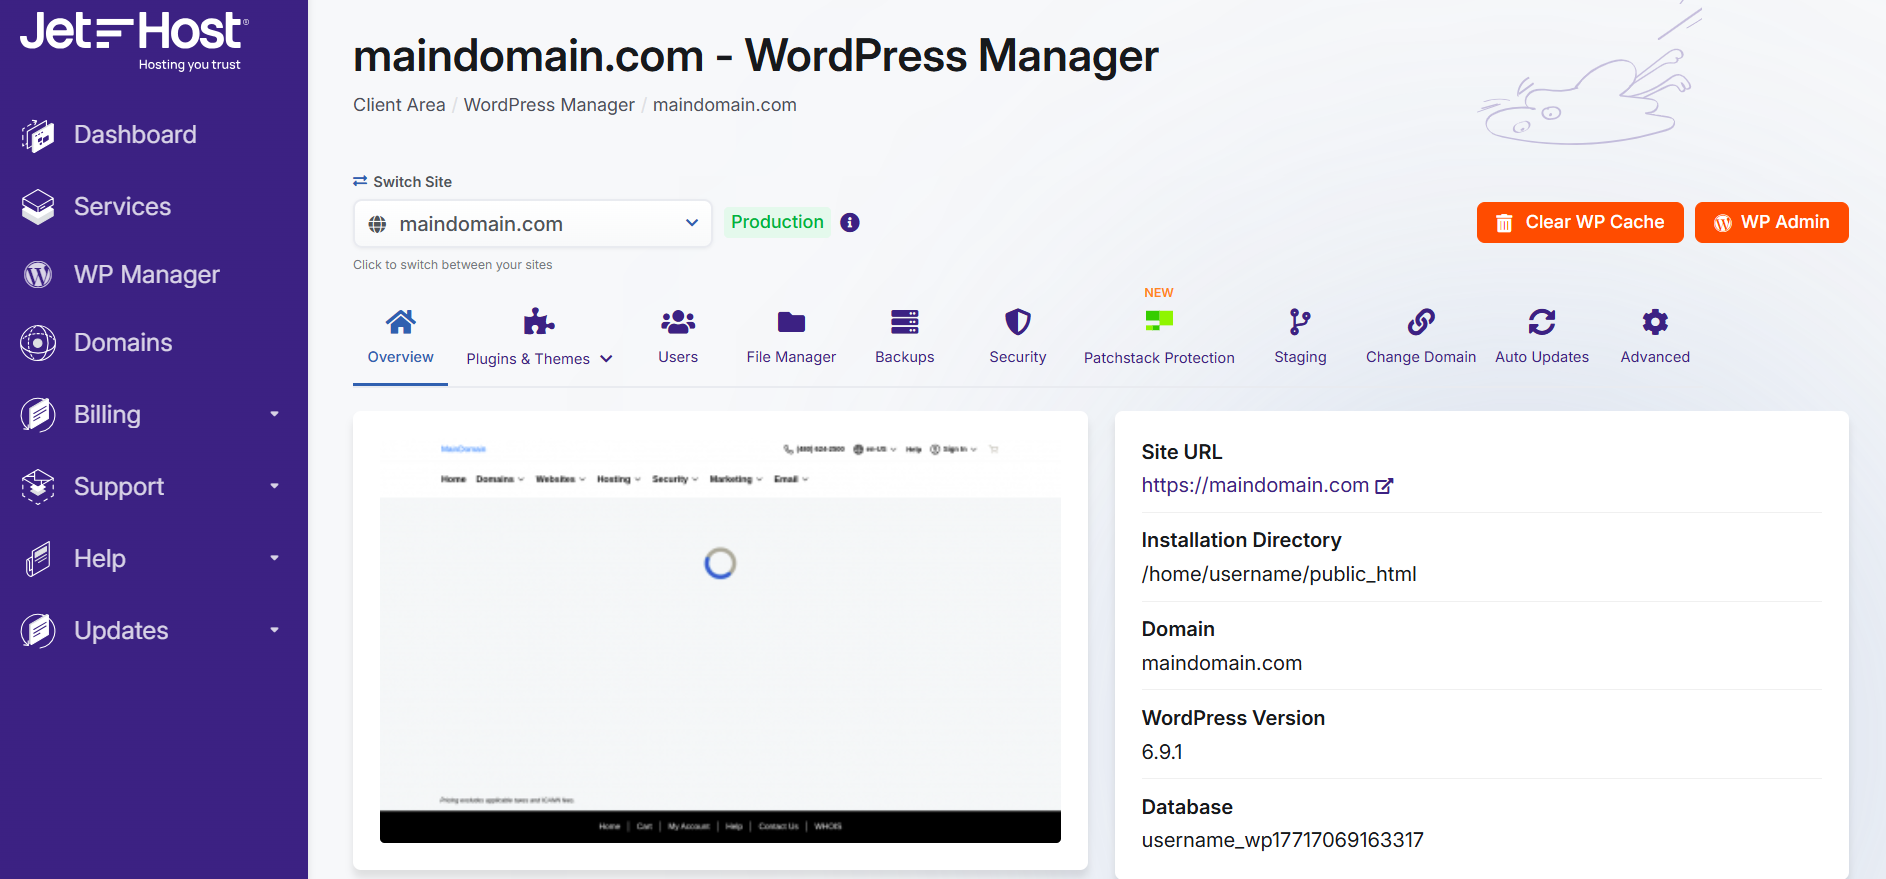
Site information panel:
- Site URL: The live URL where your website is accessible
- Installation Directory: The server path where WordPress files are stored
- Domain: Your website’s domain name
- WordPress Version: The current version of WordPress running on your site
- Database: The database name used by your WordPress installation
Environment indicator:
- Production: Indicates this is your live website serving real visitors
- Staging: Shows if you’re viewing a staging/test environment
Using the quick action buttons
The Overview tab includes several convenient buttons for common tasks:
Clear WP Cache button:
This button instantly clears your WordPress cache, which is useful when:
- You’ve made changes to your site and they’re not appearing
- Testing new designs or functionality
- Troubleshooting display issues
- After updating plugins or themes
Simply click the “Clear WP Cache” button and the cache will be purged immediately, forcing fresh content to load.
WP Admin button:
This button provides instant access to your WordPress admin dashboard. Instead of typing your URL and login credentials, you can:
- Click “WP Admin” to open your WordPress dashboard in a new tab
- Access your site automatically without entering credentials
- Switch quickly between WordPress Manager and your WP admin
Switching between your sites
If you manage multiple WordPress installations, the “Switch Site” dropdown at the top allows you to:
- View all your WordPress sites in one place
- Quickly switch between different installations
- Manage multiple sites without leaving the interface
- See which site you’re currently managing
Simply click the dropdown, select the site you want to manage, and the WordPress Manager will load that installation’s details and settings.
Understanding Production vs Staging
The environment badge (Production or Staging) helps you identify which version of your site you’re currently managing:
Production (Live):
- This is your live website accessible to visitors
- Changes made here affect your real site immediately
- Use caution when making updates or changes
- Always test changes in staging first when possible
Staging (Test):
- Safe environment for testing changes
- Isolated from your production site
- Experiment without affecting live visitors
- Push changes to production when ready
Why use the Overview tab
The Overview tab serves as your command center for WordPress site management, providing several key benefits:
- Quick access to critical information without logging into WordPress
- One-click cache clearing saves time during troubleshooting
- Instant admin access without remembering passwords
- Environment awareness prevents accidental changes to production
- Multi-site management from a single interface
Common tasks from the Overview tab
Here are typical workflows that start from the Overview screen:
1. Quick site health check:
- Open WordPress Manager
- View Overview tab to check WordPress version
- Verify you’re on the correct environment (Production/Staging)
- Note the installation details for reference
2. Troubleshooting display issues:
- Navigate to Overview tab
- Click “Clear WP Cache” button
- Click “WP Admin” to check if issue is resolved
- Proceed to other tabs if problem persists
3. Managing multiple WordPress sites:
- Use the “Switch Site” dropdown
- Select the site you want to manage
- Review the Overview information
- Access other management features from the tabs
Best practices
To get the most out of the Overview tab, follow these recommendations:
- Always verify the environment badge before making changes
- Bookmark the WordPress Manager for quick access
- Clear cache after updates to ensure changes display correctly
- Note your database name for backup and migration tasks
- Check WordPress version regularly to ensure you’re running current software
- Use the site switcher rather than navigating back repeatedly
Next steps
The Overview tab is just the starting point. From here, you can access additional WordPress Manager features:
- Plugins & Themes: Manage and update your WordPress plugins and themes
- Users: Add, edit, or remove WordPress user accounts
- File Manager: Browse and manage your WordPress files
- Backups: Create and restore backups of your site
- Security: Monitor and enhance your WP security
- Staging: Create test environments for safe development
- Auto Updates: Configure automatic updates for WordPress core, plugins, and themes
- Advanced: Access advanced configuration options
Each tab provides specialized tools for managing different aspects of your WordPress site, all accessible from the WordPress Manager included with your hosting for WordPress plan.
Need more help?
The WordPress Manager Overview tab provides essential information and quick actions for managing your WordPress site efficiently. Whether you’re checking your site details, clearing cache, accessing your admin panel, or switching between multiple installations, the Overview screen offers a centralized command center for your WordPress management tasks.
Explore more WordPress Manager guides and hosting tutorials in our knowledgebase. The WordPress Manager is included free with all hosting for WordPress plans at JetHost.