



How to Use Claude to Build a Website: A Step-by-Step Guide for Beginners

You can build a full website using Claude AI by planning your pages, generating HTML and CSS through clear prompts, adding optional JavaScript, testing the code, and uploading the final files to a hosting account.
I’m Metodi Drenovski, CEO and co-founder of JetHost. After more than 22 years of building hosting platforms, I’ve watched AI-powered web development go from a novelty to a rapidly growing trend. Claude, Anthropic’s AI assistant, is a big part of that shift.
By the end of this guide on how to use Claude to build a website, you’ll know how to plan, build, test, and publish a site with Claude, from your first prompt to a live launch.
Can Claude Create a Website?
Yes, in practice, Claude can create a website. But what you get is the code and content rather than a site that’s already live and hosted somewhere.
Claude is an AI assistant that converts your ideas, expressed in plain language, into code. What’s good about it is that you don’t need a programming background to use it.
Claude works well for projects with a clear structure and a manageable number of pages, such as:
- Landing pages
- Portfolios
- Small business sites
- Blogs
For web development, Claude AI can do the following:
- Write HTML, CSS, and JavaScript (the code that builds, styles, and adds interactivity to a webpage)
- Work through technical problems with you
- Iterate on a design across as many rounds as you need
- Optimize your content for SEO (the practice of helping your site show up in search results)
What You Need Before You Start Building a Site With Claude
Here’s what you need before building a website with Claude:
- A Claude account: The free tier works for simple sites, while Claude Pro gives you access to more advanced models for larger or more complex builds.
- A plain-text or code editor: You will use it to save your files. VS Code, Notepad++, or even Notepad all work well.
- A clear idea of what your website needs: Pages, sections, colors, tone, and the overall goal of the site. You can even reference websites or inspiration links with Claude to describe the look you want.
Additionally, to get your Claude website live once it’s built, you’ll also need the following:
- A shared hosting account with cPanel access: cPanel is the hosting control panel most providers use, and it’s where your finished website files will live. All web hosting plans from JetHost give you access to cPanel.
- File Transfer Protocol (FTP) credentials from your hosting provider: FTP is a method for transferring files between your computer and your hosting account. Your FTP credentials include the host address, username, password, and port number. You can find these details in your hosting provider’s welcome email or in cPanel under Files > FTP Accounts. This isn’t mandatory, and you’ll need it only if you use an FTP client like FileZilla instead of cPanel’s File Manager.
With these in place, you’re ready to start building.
When you’re ready to go live, JetHost makes web hosting simple with free SSL and easy setup.
How to Use Claude to Build a Website
In the tutorial below, I show you how to create a website using Claude step-by-step. I encourage you to take your time and not skip any steps.
Step 1: Define Your Requirements
Before asking Claude to generate a website, define what you’re building as clearly as possible in a document.
Create a simple website specification that covers the following:
- The purpose of the website
- The target audience
- The page structure (single-page or multi-page)
- The sections needed on each page
- The visual direction, including colors, typography, and overall style
- Any technical needs, such as making sure the site looks good on phones (responsive design) or is usable for people with visual or motor impairments (accessibility)
The more specific this document is, the better Claude’s output will be. It doesn’t need to be long: a few sentences per bullet point is enough. For example, your website specifications can look like this:
“Purpose: a lead-generation site for a freelance photographer.
Audience: couples and small businesses looking to book a shoot.
Structure: single page.
Sections: sticky nav with CTA, hero, services (three columns), testimonials, contact form.
Visual style: dark background, white text, gold accents.
Technical needs: mobile-friendly, readable by screen readers.”
The more specific this document is, the better Claude’s output will be.
If you’re unsure whether you’ve included enough detail, you can ask Claude to review it and identify any missing requirements before moving forward.
Once you’re happy with the specification, save it, because you’ll upload it to your Claude Project in the next step.
Step 2: Create a Claude Project and Upload Your Specification
Once your website specification is complete, the next step is to set up a Claude Project.
A Claude Project is a dedicated workspace where Claude can consistently reference your instructions and files throughout the entire build process. Instead of re-explaining your idea every time you start a new chat, you centralize everything in one place.
To set up a Project for designing a website with Claude, follow these steps:
- Click on the Projects tab on the left-side panel.
- Find the New Project button, and name your project accordingly. For example, “My Website Builder.”
- Upload the specification document you created in Step 1 to the Instructions.
- Add any additional assets you already have (such as branding notes, copy, or design references) in Files.
From this point on, use this Project for all prompts related to your website. Claude will be able to reference your documents automatically.
This setup becomes the foundation for building your site step-by-step with Claude in a controlled and organized way.
Step 3: Generate Your Website’s HTML Structure
This is where the coding with Claude starts—a crucial stage in how to use Claude to build a website.
In this step, you need to ask Claude to write the full HTML skeleton for your website.
Work on one page at a time to keep the output manageable and make it easier to review everything.
Remind Claude to use semantic HTML5 tags. These are elements like <header>, <nav>, and <section> that describe their content’s purpose rather than generic <div> tags. They help screen readers and search engines understand your page.
Additionally, ask for code comments on each block, so you can tell what each part does without reading the raw code, and a clean and readable structure.
Here’s a sample prompt that generates a complete page structure using semantic HTML5:
“Write semantic HTML5 for a single-page lead generation website of a freelance photographer from the plan: a sticky nav with a CTA button, a hero section, a services section with three columns, a testimonials section, and a contact form. Add comments to each section.”
Once Claude generates the HTML, copy it into your text editor and open it in a browser to preview it right away. This early check helps you catch structural issues before moving on.
From here, send follow-up prompts to adjust the layout, add or remove sections, or change content. Small, targeted requests tend to produce more reliable edits than asking for a full rewrite.
If you really are a photographer building an image-heavy site, our guide to the best hosting for WordPress for photographers compares storage, CDN performance, and backup options.
Step 4: Style Your Website With CSS
With the HTML structure in place, the next step is to bring the website to life with CSS. This part of the Claude AI coding tutorial for websites is where your site stops looking like plain text and starts coming together visually.
Ask Claude to generate CSS that matches your intended brand direction and works with the HTML you already created. Make sure you reference the existing structure rather than asking for a redesign of the page.
Here’s a simple prompt for styling your site with custom CSS:
“Write CSS for the freelance photographer HTML from the previous step. Use a dark background, white text, and gold accents. Make it mobile-first and include responsive media queries. Use modern layout techniques like Flexbox or Grid.”
If you’re using a separate CSS file, ask Claude to reference it correctly in the HTML <head> with a <link> tag. A broken or mistyped link here is one of the most common reasons a site loads with no styling at all.
As Claude generates CSS, you will typically see rules for these elements:
- Fonts
- Spacing
- Layout systems
- Color values
- Responsive breakpoints (settings that adjust the layout for phones, tablets, and desktops)
You don’t need to memorize these, but understanding what they control will help you describe changes more clearly later.
When something looks wrong, paste the relevant code into the chat, describe exactly what you’re seeing, and ask Claude for a specific fix.
Avoid asking Claude to rewrite large blocks of code unless the issue truly calls for it. Targeted fixes are easier to verify and less likely to introduce new problems.
Step 5: Add Interactivity With JavaScript (Optional)
Not every website needs JavaScript, but some features depend on it. Common examples of JavaScript features include the following site elements:
- Mobile hamburger menus
- Image sliders
- Form validation
- Scroll animations
You don’t need to know how to code to ask for these features. Describe the behavior you want, and Claude will write the script. Here’s an example of a prompt that adds a mobile-friendly hamburger menu to your site:
“Add a hamburger menu toggle for mobile screens to my existing HTML and CSS. Explain what each part of the script does.”
Keep your JavaScript additions simple. Not every site benefits from extra scripts, and unnecessary code can slow page load times, which affects both visitor experience and search rankings.
Claude will often explain the code as it generates it. That explanation is worth reading even if you don’t plan to edit the script yourself, since it helps you describe issues more clearly if something breaks later.
Step 6: Review Your Code Before Uploading
Don’t upload your files blindly. Check your code in a plain-text editor first.
Here’s a short pre-upload checklist that catches the most common mistakes, and why each one matters:
- <!DOCTYPE html> is the very first line of the HTML file. Without it, browsers can render the page inconsistently.
- The <link> tag correctly references style.css (if you’re using a separate file), with matching filename and casing. A mismatch is the most common reason styles don’t load.
- All filenames are lowercase and spelled correctly. Most servers are case-sensitive, meaning Index.html and index.html count as two different files.
- The viewport meta tag is present: <meta name=”viewport” content=”width=device-width, initial-scale=1.0″>. Without it, the layout won’t adjust properly on phones.
- The <title> and meta description aren’t generic placeholder text. These show up in browser tabs and search results.
- Navigation buttons link to the correct section IDs, not placeholder values. Mismatched IDs mean clicking a nav link does nothing.
You can request Claude to audit the code itself, but ask it to list the problems and proposed fixes first, before making any changes. That gives you a chance to review what’ll change rather than letting edits happen blindly.
Always back up your files before letting Claude modify anything, and test the site again after each change. This is an important part of how to use Claude to build a website that’s ready to launch.
Step 7: Test Your Site in the Browser and Fix What Breaks
Open your files in a browser and check every section on both desktop and mobile. Resize the window or use your browser’s device toolbar to simulate different screen sizes.
When you spot a bug, paste the relevant code block into the chat and describe exactly what’s wrong. The more specific you are, the more accurate Claude’s fix will be.
Here are common site issues and how to approach them:
| Symptom | Likely Cause | Fix |
|---|---|---|
| White screen, “Index of,” or 403 error | index.html is misnamed or in the wrong folder | Confirm the file is lowercase and sits in public_html, the main folder your hosting account uses for live site files |
| Site displays as plain text | CSS isn’t loading | Ask Claude to fix the style.css link path and confirm the file is in the same directory as index.html |
| Broken image placeholders | Images weren’t uploaded, or the paths are wrong | Upload the actual images, update the paths in index.html, and use your browser’s developer tools (F12) to find the broken element |
| Broken layout on mobile | Missing or incorrect viewport meta tag | Prompt Claude to check and fix it |
| Generic title or no Google snippet | Meta title or description is missing | Ask Claude to write and insert them |
Beyond fixing bugs, ask Claude for a general review using this prompt:
“Review this code and suggest improvements for performance, accessibility, and SEO.”
Claude can also help rewrite headlines, calls-to-action, and body copy, so don’t overlook the content layer once the technical work’s done.
How to Upload Your Claude Website to Hosting With JetHost
Once your files are tested and ready, it’s time to put them on a live server.
JetHost gives you two ways to do this:
- Using JetHost AI Connector
- cPanel’s File Manager for a single, one-time upload.
- Connecting your JetHost account via FTP, which you’ll reuse every time you update the site.
Option 1: Using the JetHost AI Connector
If you’d rather let Claude handle the upload for you, the JetHost AI Connector makes that possible.
Instead of downloading your files and dragging them into File Manager, you upload everything directly from your Claude chat.
These steps use the Claude web version, but the same process works in the desktop app too:
- Connect the JetHost AI Connector to Claude: Log in to your JetHost Client Area and open the JetHost Connect page. Here’s what you should see:
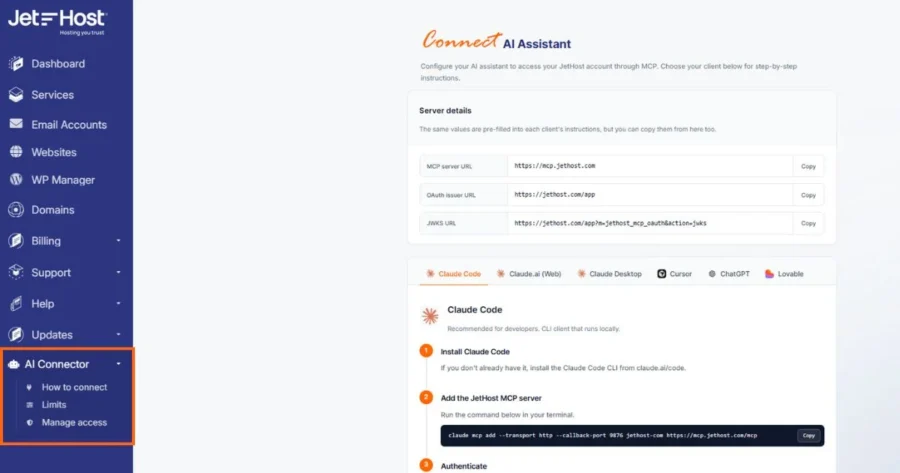
Copy the MCP server URL you find there and add it to Claude’s MCP settings. Then authorize the connection using your JetHost account credentials.
- Download your website files: If you built your site in a previous chat, download all the generated files to your computer first.
- Open a new chat and verify the Connector is active: Open a new Claude chat and make sure the JetHost AI Connector is enabled. The easiest way to check is to click the [+] button next to the message input and hover over Add Connector to see the list of active connectors. Here’s what it looks like:
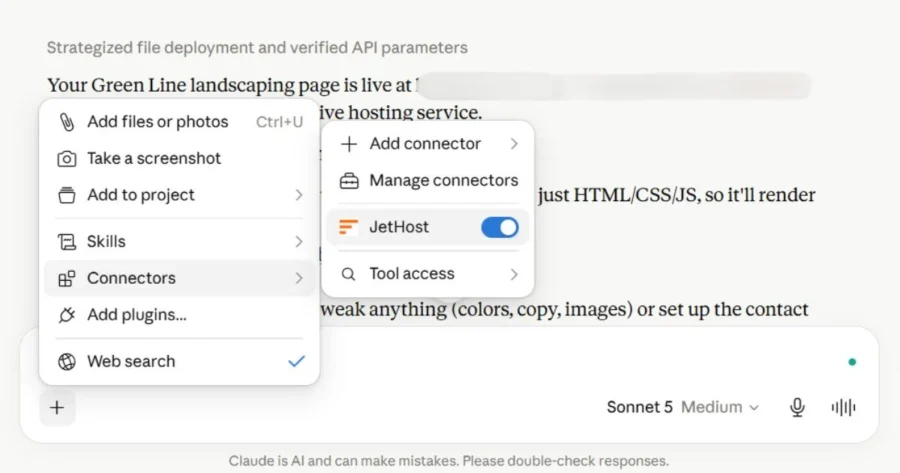
Confirm the JetHost AI Connector is listed before moving on.
- Upload your files, send the prompt, and confirm: In that same chat, upload all your website files and send a prompt along the lines of: “Hi, can you please upload this design to the File Manager? Upload all of these files into the public_html folder.” Claude will ask for cpanel:uapi permission to perform the upload. Review the questions and confirm. The upload may take a few minutes.
- Check if your files are uploaded: Once it’s done, log into cPanel and open File Manager to confirm all your files are sitting in the public_html folder.
- Test your site: Open your domain in a browser and go through the site. Check that the layout looks correct, all links work, and the pages load as expected.
Option 2: Using cPanel File Manager
- Open cPanel and go to Files > File Manager.
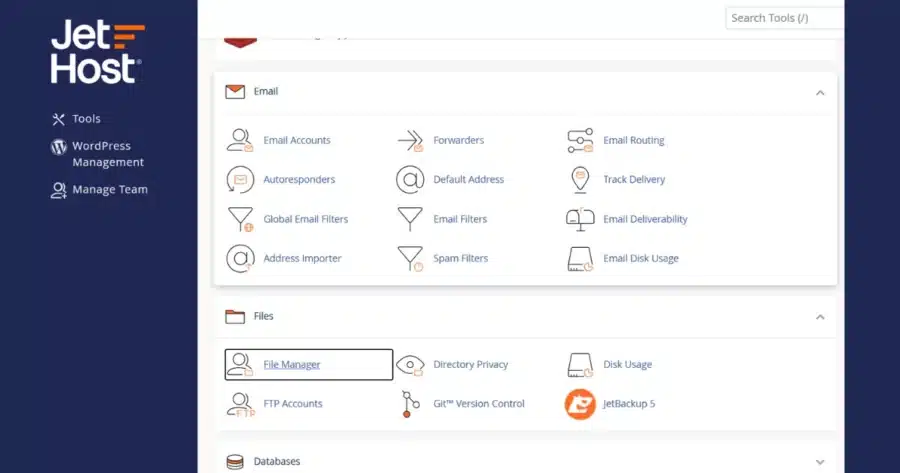
- Navigate to the public_html folder.
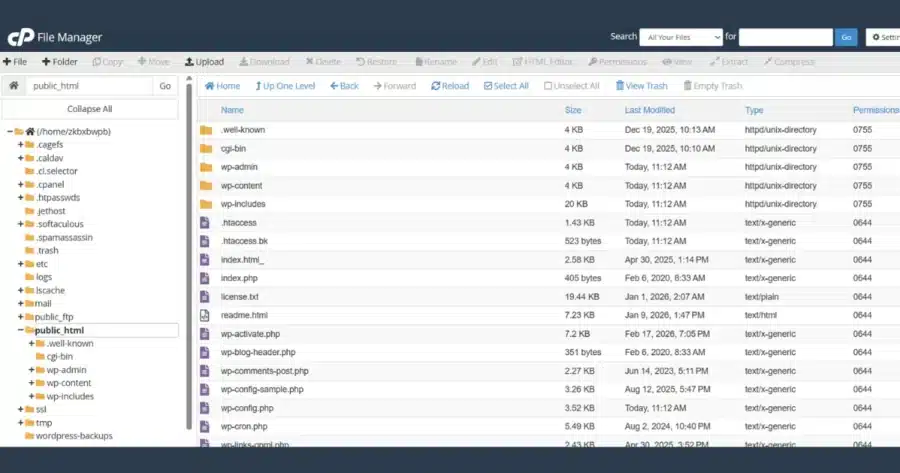
- Click Upload and drag your index.html file in.
- Place style.css in the same public_html root folder.
Common issue: If a file uploads as index.html.txt instead of index.html, right-click it in File Manager and rename it.
Option 3: Connecting to your JetHost hosting account through FTP
- Open your FTP, like FileZilla, and enter your host (your domain), your cPanel username and password, and port 21 in the Quickconnect bar.
- Click Quickconnect.
- Your local files appear on the left, your JetHost files on the right.
- Drag your files from the left panel into public_html on the right to upload them.
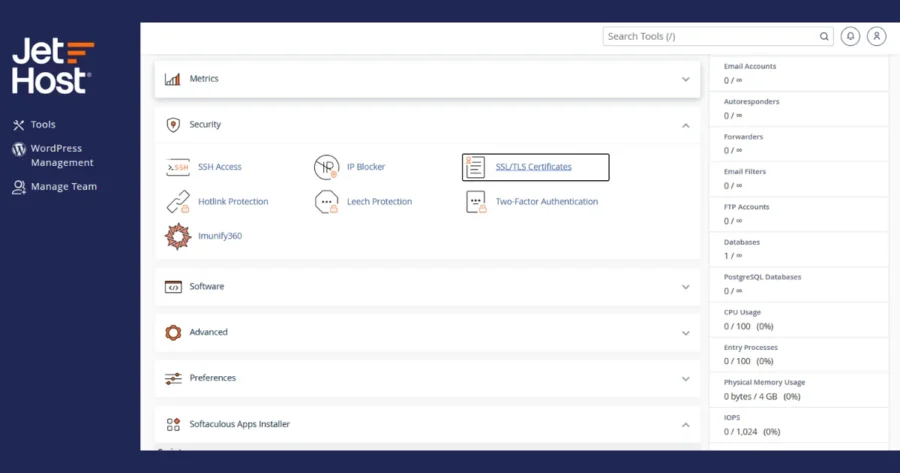
Pro tip: Activate your SSL certificate by going to cPanel > SSL/TLS and clicking Let’s Encrypt to issue a free security certificate. This step matters because without it, browsers show visitors a “not secure” warning on your site.
Conclusion
And that’s how to use Claude to build a website, from your first prompt through to launch.
We walked through the full path from a blank page to a live launch, but you need to remember that AI isn’t a magic wand. Study what Claude got wrong and what you got wrong in the prompt, and make each round better than the last.
Once your site is built and tested, the only thing left is getting it live, and JetHost makes that the fastest part: upload your files, point your domain, and you’re all set.
Build your site with Claude, and let JetHost handle the rest—simple uploads and expert support whenever you need it.
FAQ
Is Claude enough to build a complete website without hiring a developer?
Yes, for simple, well-scoped sites. Claude writes the code and the content, but you’re still the one testing it, fixing what’s off, and uploading the files to hosting.
Do I need to know how to code to use Claude for web development?
No. You describe what you want in plain language, and Claude translates that into working code. Understanding basic terms like HTML, CSS, and FTP will help you communicate more precisely, but you don’t need prior coding experience to get started.
How long does it take to build a site this way?
Most sites can be built in a few hours to a couple of days. A simple landing page is often planned, built, and tested in a single session, while a larger multi-page site typically takes longer to refine content, structure, and design before launch.
What’s the difference between using Claude AI and Claude Code to build a website?
Claude AI in chat works well for generating and explaining code piece by piece, which suits beginners who want to copy files manually. Claude Code is built for working directly within a project’s file system, which suits developers managing larger codebases who’d rather skip the copy-and-paste step entirely.
Can Claude create a website for me without any hosting knowledge on my part?
Claude can write the code, but you still need a hosting account to put the site online. JetHost’s support team can help if the hosting and upload side feels unfamiliar.