


Can ChatGPT Create a Fully Functional Website? (+Tutorial)

ChatGPT can create a website, specifically write the code, but it can’t host your website, deploy your files, or test what it built.
AI-assisted web development has gone from a novelty to a genuine part of how websites get built, and I want to give you a realistic picture of how to use it well.
I’m Metodi Drenovski, CEO and co-founder of JetHost, with more than 22 years of experience building hosting platforms and supporting online businesses.
To build a working website with ChatGPT, you need to understand its limitations; otherwise, you may end up with files you don’t know how to use.
In this guide, I cover:
- Whether it’s realistic to create a website with ChatGPT
- Where it falls short, and what you still need to handle yourself
- A step-by-step process from the first prompt to the live website
- How to upload and publish your finished site using JetHost
Can ChatGPT Create a Website?
Yes, ChatGPT can create a website, but it’s more accurate to say it creates the materials for one.
Think of it as an AI coding assistant for websites: it writes code, explains concepts, and responds to your instructions in real time. Website development using ChatGPT is collaborative by nature. That makes ChatGPT a powerful collaborator in web development, not a one-click publishing solution.
Here’s a clear breakdown of what it genuinely handles well:
1. Generate the Code
ChatGPT can write front-end and back-end code across a wide range of formats and frameworks.
For most website projects, that includes:
- Static websites: clean HTML and CSS with no server-side requirements
- Responsive landing pages: designed to adapt correctly across desktop, tablet, and mobile
- Portfolio websites: structured to showcase work, case studies, or creative projects
- Business websites: multi-page layouts with a homepage, services section, about page, and contact form
- Blogs: template-based structures with article and archive patterns
- eCommerce front ends: product listings, cart UI, and checkout page designs
- Web apps: functional interfaces built with React, Next.js, Vue.js, and similar frameworks
The quality of output depends heavily on how specific your prompt is. Vague instructions return a generic code. Detailed prompts covering layout preferences, color choices, typography, and functionality return code that needs far fewer revisions.
2. Design the Website
ChatGPT’s web design capabilities go beyond just generating layouts.
Even with no design background, you can ask it to suggest the following:
- Layouts and wireframes: described in plain language or written directly into HTML structure
- Color schemes: hex codes, complementary palettes, and contrast recommendations for accessibility
- Typography: Google Fonts pairings and sizing guidelines
- UX decisions: navigation structure, button placement, and call-to-action positioning
- Mobile responsiveness: CSS rules and breakpoints to ensure the layout works on smaller screens
Keep in mind that ChatGPT can’t see your design in real time. Visual feedback requires you to test the output in a browser, identify what needs to change, and describe it back to ChatGPT in your next message.
3. Write the Content
AI website creation doesn’t stop at code. One of the most practical uses of ChatGPT in web development is content creation. It can draft the following content:
- Homepage copy and headlines
- About page narratives
- Product and service descriptions
- Blog posts and articles
- Contact page introductions
- SEO-friendly page content with natural keyword integration
For small business owners, content is often the hardest part of launching a website. Having a working first draft, even one that needs editing, saves hours of work and removes the blank-page problem entirely.
What Are ChatGPT’s Limitations?
This is what ChatGPT can’t handle on its own:
- Run or deploy code: ChatGPT generates files; you decide where they go
- Connect to databases: server-side data handling requires additional tools or a dedicated back-end
- Manage user authentication or payments: these need integration with services like Stripe, Auth0, or WooCommerce
- Test code in a live environment: only you can open a browser and verify what the page looks like
- Debug automatically: ChatGPT suggests fixes when you share error messages, but it can’t catch issues it has not seen
- Install or manage WordPress: ChatGPT handles child themes, block patterns, and plugin configurations well, but it can’t install WordPress, access your admin panel, or deploy files to a server.
For users who want to build a WordPress site without managing everything manually, JetHost includes a WordPress Manager in its hosting plans.
Launch your website with hosting for WordPress by JetHost. Install with one click, enable staging, auto-updates, and security controls.
How to Create a Working Website With ChatGPT from Scratch
ChatGPT website development follows a clear sequence: prompt, test, refine, and upload. Whether you want to build a website with ChatGPT for business, a portfolio, or a personal project, this workflow applies to any type of site.
I cover each step in detail below.
Step 1: Gather Your Tools
To create a website with ChatGPT, you’ll only need a few tools ready before you write your first prompt:
- A free or paid ChatGPT account at chat.openai.com
- A code editor. Options like Zed (GPU/AI-based), Cursor, Lovable, VS Code, or Vim (terminal editor) work well
- A browser for local testing (Chrome, Firefox, Edge, or Arc all work well)
- A hosting account for publishing, like JetHost. If you don’t know how to choose a web hosting service, read our guide, which walks you through what to look for.
For a basic HTML and CSS site, you don’t need Node.js, Python, or any local development environment. For React or Next.js projects, you need to install Node.js.
Pro tip: Create a dedicated folder on your computer for web projects before you start. Avoid saving project files to Downloads or Desktop, where they are easy to lose track of.
Step 2: Choose What Features You Want Your Website to Have
Before writing a single prompt, define what you want your website to include.
If you are building for the first time, start small. One interactive feature is enough for an initial build.
Good beginner-friendly options include:
- A button that changes the page color scheme (dark/light mode toggle)
- A countdown timer showing days, hours, minutes, and seconds until an event
- A contact form with basic validation
- A button that shows a message when clicked
Once you have your feature in mind, ask yourself these questions:
- How many pages does the site require?
- Does it need a contact form, photo gallery, or FAQ section?
- Should it work on mobile devices?
- Do you need a blog or a news section?
- Is there a specific visual style: minimal, bold, professional, creative?
Specificity is the single biggest factor in output quality. Writing down your answers before opening ChatGPT makes every prompt more effective.
Step 3: Request Your Code From ChatGPT
This is the step where ChatGPT creates your website code. Every good prompt for a website build should include the following:
- What you want to build
- Which coding languages to use (HTML, CSS, JavaScript)
- Your experience level (so ChatGPT adjusts its comments and explanations)
- A request for complete, immediately usable files with specific file names
Start with a clear, structured prompt. Here’s a practical example:
“Create a single-page business website for a landscaping company called Green Line. Include a hero section with a headline and a call-to-action button, a services section listing lawn care, tree trimming, and garden design, a brief about section, and a contact form. Use a clean layout with a green and white color scheme. Write all the HTML, CSS, and JavaScript in a single index.html file.”
If ChatGPT returns multiple separate files, ask it to consolidate them:
“Combine these files into one index.html file with the JavaScript, CSS, and HTML all inside it.”
Keeping everything in one file makes it easier to test and iterate with ChatGPT. You will separate the files later.
Step 4: Create a Project Folder and Save Your index.html File
Once ChatGPT returns your code, do the following:
- Create a new folder on your desktop or in your documents, for example, my-website
- Open your code editor and create a new file inside that folder called index.html
- Paste the ChatGPT-generated code into the file and save it
The filename index.html matters. Most web servers look for it by default when loading a homepage, so using any other name will cause the page not to load correctly once you go live.
For multi-page sites, create a separate HTML file for each additional page (about.html, services.html, contact.html) inside the same folder.
Step 5: Test Your ChatGPT Website Locally Before Publishing
Building a website with ChatGPT means the output needs to be verified before it goes live. Open the file in a browser first, and do this:
- Navigate to your project folder
- Right-click index.html and select Open with [Your Browser]
Check every section of the page. Look for broken layouts, missing fonts, incorrect colors, and content that needs editing.
Note anything that doesn’t match what you asked for before moving to the next step.
Additionally, you can share screenshots with ChatGPT to help it understand the issue more clearly.
Step 6: Use the Browser Console to Diagnose Issues
If something is not working, open your browser’s developer tools. Here’s how to do it:
- Press F12 or Ctrl+Shift+I on Windows, or Cmd+Option+I on Mac
- Click the Console tab
- Look for red error messages
Copy any error text and paste it into ChatGPT with a brief explanation:
“This error appeared in my console when testing the contact form. What does it mean and how do I fix it?”
ChatGPT handles debugging prompts well when you provide the exact error message.
Step 7: Ask ChatGPT to Clean and Simplify Your Code
Using ChatGPT to create a website is fast, but the generated code isn’t always correct. For longer requests, ChatGPT can produce redundant CSS rules, duplicate HTML elements, or unused JavaScript.
Before uploading, ask it to review what it wrote. Here’s an example prompt you can use:
“Please review the code you generated, remove any duplicate styles, simplify the CSS where possible, and confirm there are no unused classes or functions.”
Cleaner code loads faster, is easier to maintain, and reduces the chance of errors in production.
Step 8: Move All JavaScript to Its Own File
Now that the code is working and clean, it’s time to split it into separate files as you would for any production site.
Keeping JavaScript inside your HTML file works fine for testing, but separating it is a good practice, especially if you plan to add features later.
Ask ChatGPT this: “Please extract all the JavaScript from this HTML file and move it into a separate file called script.js. Update the HTML to reference it correctly.”
Do the same for large CSS blocks—move them to a style.css file and link it in the <head> section of your HTML.
After separating the files, test locally again. Most issues at this stage come from a filename capitalization mismatch. For example, script.js in the HTML links to a file saved as Script.js on disk. Servers treat these as different files even if your local device doesn’t.
How to Host and Publish Your ChatGPT Website on JetHost Manually
So, you’ve used ChatGPT to design a website and tested it locally. Now you need hosting to make it live on the internet.
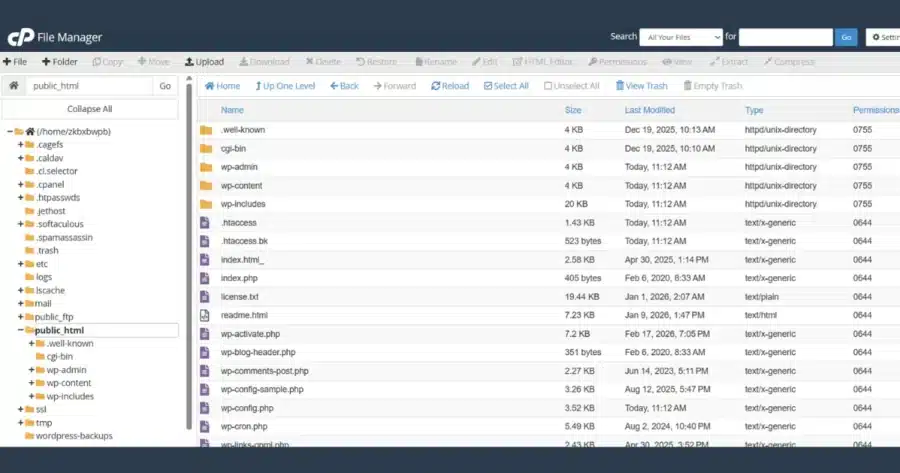
The following steps use JetHost’s cPanel hosting and File Manager to upload and activate your website manually.
Step 1: Access Your File Manager in cPanel
JetHost gives you two paths to your website’s file directory.
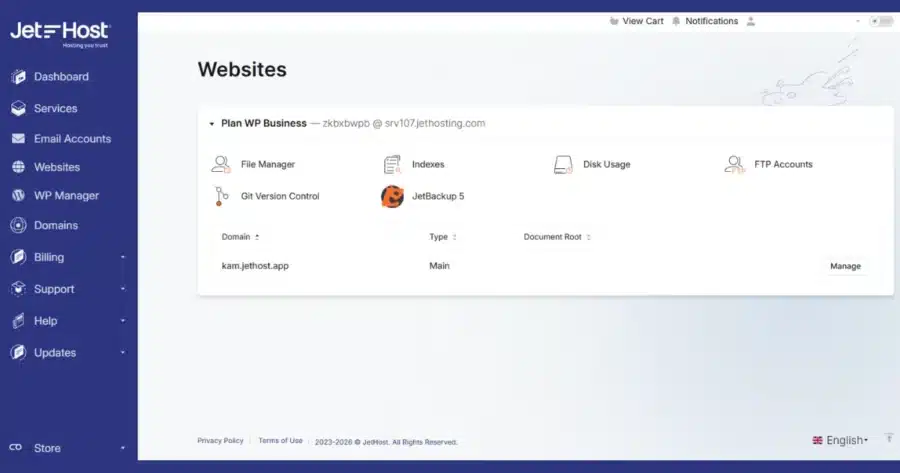
Option A: Through your JetHost account
- Log in to your JetHost account
- Go to Websites
- Click Manage next to the domain you want to use
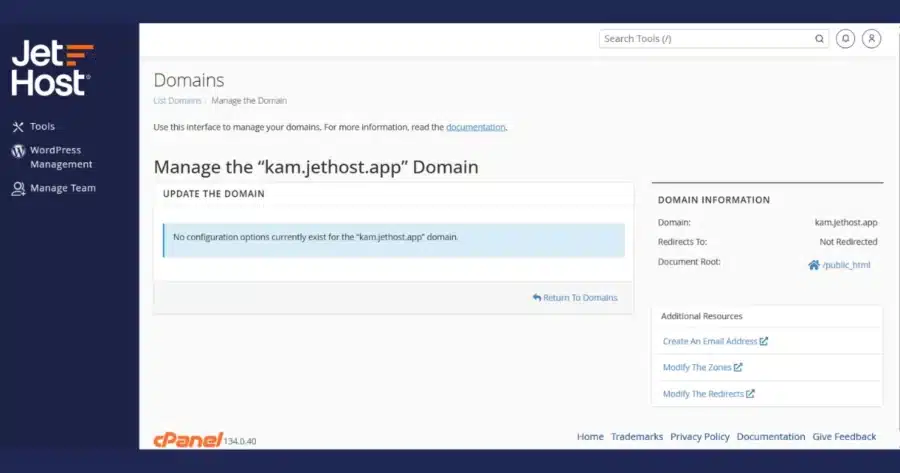
- Under Domain Information, click the hyperlink next to Document Root
Option B: Through cPanel directly
- Log in to cPanel
- Go to Tools > Files > File Manager
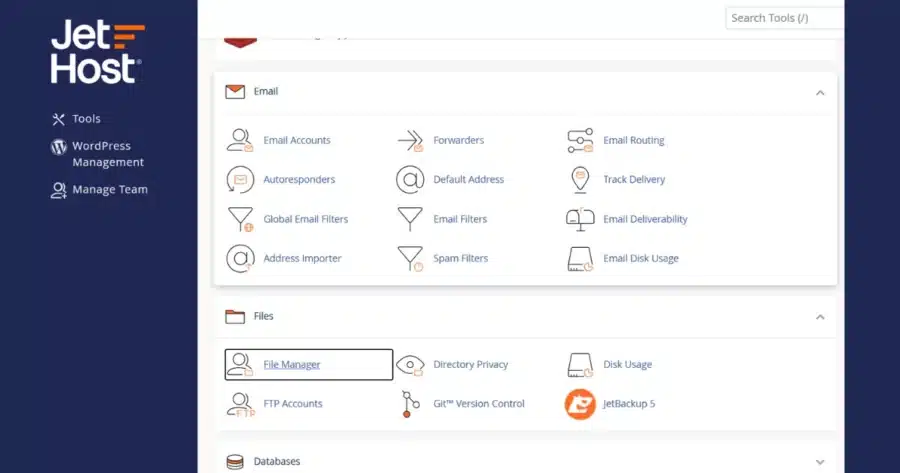
- Navigate to your website folder (public_html) for your primary domain
Step 2: Upload Your ZIP File to the Right Folder
- Download your files from ChatGPT as a single ZIP file. If ChatGPT has not offered this format, ask it to present the files that way.
- In File Manager, confirm you are inside the correct website folder (public_html or a subdomain folder)
- Click Upload in the File Manager toolbar
- Select your ZIP file and let the upload complete
- Once uploaded, right-click the ZIP file and select Extract
- Confirm the extraction path matches your current folder, not a subfolder inside it
After extraction, your index.html should appear directly inside the website folder, alongside your style.css, script.js, and any image files.
Step 3: Test the Design in Your Browser
Open your domain in a browser. If DNS is already pointing to JetHost, your site will be live immediately. If you have just registered or transferred the domain, DNS propagation can take up to 24–48 hours.
Check the same elements you reviewed locally: layout, typography, form behavior, and mobile responsiveness.
If anything looks different from your local version, the most common cause is a file path issue—a linked resource referencing a local path that does not exist on the server.
Share the specific issue with ChatGPT and ask it to correct the relative paths in your HTML.
How to Upload Your Website to JetHost Using AI Connector
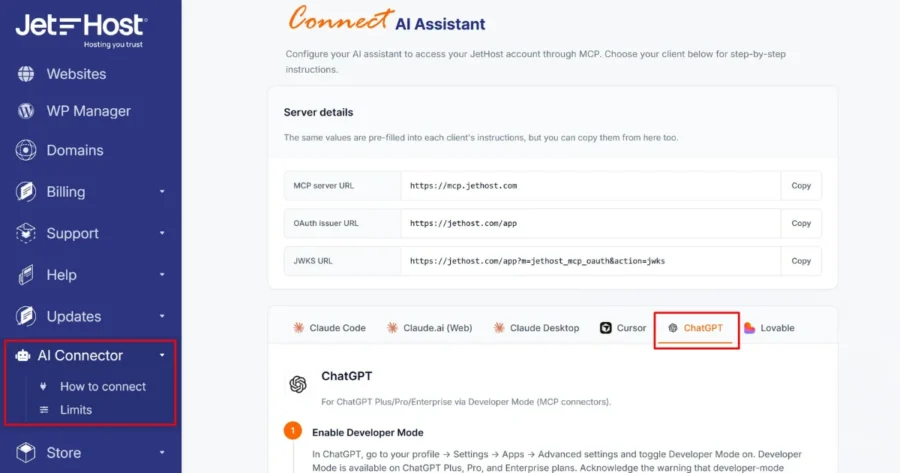
If your project files are stored in a GitHub repository, you can skip the manual upload entirely. The JetHost AI Connector connects to your JetHost account and deploys your site directly from GitHub with a single prompt. No FTP, no file manager, no technical setup.
Before you start, you’ll need:
- A JetHost hosting account with the AI Connector connected to your profile
- Your website files in a private GitHub repository
- Access to that repository on GitHub.com
The whole process takes about 10 minutes.
Step 1: Tell the AI What You Want
Open the AI assistant connected to your JetHost account and paste this starter message:
“Hi! I’d like to publish my website from GitHub to my JetHost hosting, using the JetHost tools connected to my account.
- My repository: https://github.com/… (paste your link)
- My website (domain): example.com (your domain)
Please walk me through it step by step:
1. Generate the deploy key and tell me exactly what to paste into GitHub.
2. Create the .cpanel.yml settings file for me. When you write it, please use simple cp copy commands and follow these rules: copy the files into my site’s folder without deleting anything already there; do not use rsync; and at the very end set permissions to the standard web values — folders to 755, files to 644, and the site’s own folder to 751 (this last step must be the last line). Show me the file before we use it.
3. Once the key and the file are in place, publish the site and then check that it loads correctly.”
The assistant already knows your hosting account, so you don’t need to look up folder names or account details. It just needs your repository link and your domain.
Step 2: Add the Deploy Key to GitHub
The assistant will generate a deploy key, a read-only pass that lets your hosting fetch code from GitHub without being able to change or delete anything in your repository.
Copy the key the assistant gives you, then:
- Open your repository on GitHub.com
- Click Settings in the repository’s top menu
- Click Deploy keys in the left sidebar
- Click Add deploy key
- Give it a recognisable name like JetHost and paste the key into the Key field
- Leave “Allow write access” unchecked
- Click Add key
Go back to the assistant and let it know the key has been added.
Step 3: Add the Settings File to Your Repository
The assistant will write the contents of a small file called .cpanel.yml for you. This file tells your hosting where to place your website files. To add it:
- On your repository’s main page on GitHub, click Add file and select Create new file
- In the filename box, type exactly: .cpanel.yml (the dot at the start is required)
- Paste the text the assistant gave you into the editing area
- Click Commit changes
Step 4: Let the Assistant Publish Your Site
Tell the assistant that the deploy key and settings file are both in place. It will publish your site within a few seconds. Open your domain in a browser to verify everything looks correct.
If you run into any issues or need more guidance, visit our Help Center for a detailed step-by-step GitHub publish guide.
Conclusion
As you can see, ChatGPT can create a website for many projects. Website generation with AI can reduce the time from idea to live site from weeks to hours.
But ChatGPT can’t create a website entirely on its own. You need to organize your files, choose your hosting, and handle the publishing step yourself.
However, with a clear workflow of prompt, test, refine, and upload, ChatGPT becomes an effective part of the process.
If you want an even faster path to a live WordPress website, JetHost’s AI Website Builder handles the entire setup for you. Enter your business details, and the builder generates the site structure without you needing to write or manage a single line of code.
For those who want to skip the manual upload, the JetHost AI Connector can deploy your site directly from GitHub with a single prompt.
Whatever method fits your project best, the next step is the same: get a domain, set up hosting, and publish.
Sign up for a hosting plan with JetHost with free migration, free SSL, and 24/7 expert support from real people.
FAQ
Can ChatGPT create a fully functional website with no coding experience?
Yes, ChatGPT is designed to generate working code based on plain language instructions. You don’t need to understand HTML, CSS, or JavaScript to use it.
Can ChatGPT create a website for free?
Yes. ChatGPT has a free plan, though access to the latest models requires a paid subscription. The code and content ChatGPT generates cost nothing. What you will need to pay for is web hosting and a domain name to publish the site online. JetHost hosting plans include free SSL and a free domain for the first year on eligible plans with a qualifying billing cycle.
Can ChatGPT create a website for me if I just describe my business?
Yes, to a significant degree. If you describe your business type, services, preferred colors, and page structure, ChatGPT will produce a working draft based on that input. You will still need to review, test, edit, and publish the result, but the heavy lifting of writing code and copy from scratch is handled for you.
Can you use ChatGPT to create a website for a business or ecommerce store?
Yes. ChatGPT can generate front-end code, product page layouts, and shopping cart UI for ecommerce projects. For a full store, you will need a platform like WooCommerce to handle products, payments, and orders. JetHost’s hosting for WooCommerce includes the performance stack, security tools, and staging environment needed to run a store reliably.
Can ChatGPT generate website code for WordPress specifically?
Yes, ChatGPT can write custom theme files, configure plugin settings, create Gutenberg block patterns, and troubleshoot WordPress errors. But it can’t handle the infrastructure. JetHost’s managed hosting for WordPress handles the infrastructure while you use ChatGPT for customization.
Can I use ChatGPT to create a website with multiple pages?
Yes. You need to request each page separately and ask ChatGPT to keep navigation, colors, and fonts consistent across all files.